上一篇 提到了 RSA 簽章驗證的原理,這邊就來實際示範一次。本文將會介紹如何使用 Corona SDK 在 Android 上實作 In-app Purchase,並且加入簽章驗證的功能。
In-app Purchase
In-app Purchase 即「應用程式內結帳」,是近來非常普遍的電子交易方式。包括 Apple iTunes 或 Google Play 等商店平台都提供了 In-app Purchase API,讓消費者可以在應用程式內直接使用商店的金流系統購買虛擬商品,而不需要開發者自已實作複雜的信用卡交易。
由於 In-app Purchase 如此普遍,Corona SDK 當然也提供這個功能。以下是個簡單的範例:
1
2
3
4
5
6
7
8
9
10
11
12
13
14
15
16
17
18
19
20
21
22
23
24
25
26
27
local widget = require ("widget" )
local store = require ("store" )
local buy_button = widget.newButton{
label = "購買" ,
width = 300 ,
height = 120 ,
left = display.contentCenterX - 150 ,
top = display.contentCenterY - 60 ,
fontSize = 50 ,
onRelease = function ()
store.purchase{"android.test.purchased" }
end
}
local function store_callback (event)
local t = event.transaction
print ("received IAP event: " .. t.state)
if t.state == "purchased" then
native.alert("Purchase" , "購買成功" )
end
store.finishTransaction(t)
end
store.init(store_callback)
android.test.purchased 是 Android 內建測試專用的虛擬商品,購買時並不會真的付錢。這支程式的實際執行過程如下:
安全考量
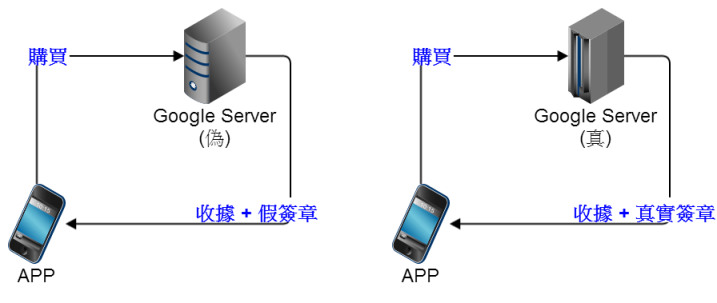
In-app Purchase 在購買時會連線至 Google 的伺服器進行線上扣款,然而這產生一個安全問題:假如有個奧客偷偷架了假伺服器,並且透過修改網路設定的方式讓手機端只能連線到假伺服器,那麼只要假伺服器永遠傳回交易成功的收據,他就可以免費取得程式中所有的虛擬商品。
為了克服這個問題,所有上架至 Google Play 的程式都會有一組 RSA 鑰匙。其中私鑰只有 Google 知道,而公鑰則交給開發者。在 In-app Purchase 交易完成時,Google 會使用私鑰產生收據簽章,由於假伺服器上並沒有私鑰,因此只要在應用程式端用公鑰進行驗證,即可判斷收據是否真的來自 Google。
實作
幸運的是,Corona 提供 OpenSSL plugin,這麼一來我們就不需要自己實作複雜的 RSA 簽章驗證。首先在 build.settings 指定我們要使用 OpenSSL:
1
2
3
4
5
6
7
8
9
settings = {
...
plugins = {
["plugin.openssl" ] = {
publisherId = "com.coronalabs"
},
},
}
接者是讀入公鑰:
1
2
3
4
5
6
7
8
9
10
11
12
13
local openssl = require ("plugin.openssl" )
local public_key = openssl.pkey_read([[
-----BEGIN PUBLIC KEY-----
MIIBIjANBgkqhkiG9w0BAQEFAAOCAQ8AMIIBCgKCAQEAsjm7ZWVI/Ol8h+6Y4omo
qns0PCBlLIwiIdBNTixzqZW5EsrkE1dIfL3uJqlIKFwByxmWO8EeZAI7NF5aFx+0
gqHdprY6eMsTtBsqj8BV+n/dsR1QNedaJ90asNuG8GImLsR2lvC8/Par4qcxqB8B
sE12wgAHdL62raPK220jSZuQFX9O8AiH0gSwvughhFxr4tz/SwoCxIVmwKaChZww
zkxX4xrZHm9GTR6MzSvJ7cHt/cnMWuhZnHXipKoM0ELa/0La01pT2EOBzEKbU+bR
23d8et6YktPQARoCe6O7Lbx4VuMm4bXeAGfESRRLiZIqMeM24DtUfUPR6Egh3s/W
GwIDAQAB
-----END PUBLIC KEY-----
]] )
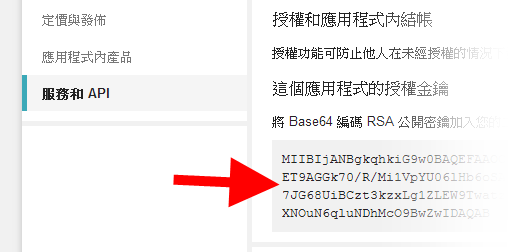
這邊的公鑰資訊來自 Google。只要登入 Google Play Developer Console,選擇你的 app 並點選「服務和 API」即可看到這支 app 的公鑰。當然,這也意味你要先上傳 APK,Google 才會為它產生 RSA 金鑰對。
接著是在 store_callback() 中加入驗證功能。需要注意的是簽章會使用 base64 編碼,我們可以使用 mime.unb64() 把它還原成二進位字串。此外 Google 簽章時使用的雜湊函式為 SHA1,這點也要一併指定。
1
2
3
4
5
6
7
8
9
10
11
12
13
14
15
16
17
18
19
20
local mime = require ("mime" )
local function store_callback (event)
local t = event.transaction
print ("received IAP event: " .. t.state)
if t.state == "purchased" then
if store.target == "google" then
local sig = mime.unb64(t.signature)
local result = openssl.verify(t.receipt, sig, public_key, "SHA1" )
if result == 1 then
native.showAlert("Purchase" , "購買成功" )
else
native.showAlert("Purchase" , "簽章驗證失敗" )
end
end
end
store.finishTransaction(t)
end